HOW TO CREATE A NEW ITEM IN THE SYSTEM
Learn the step-by-step process for adding a new inventory item, including setting up SKU's, units of measure, and hierarchy details. This guide ensures your inventory data is correctly entered for better tracking and management.
Initial Setup
1. Navigate to: https://wastockid.wasolutions.com/items
2. Click "+New"
Basic Information
3. Type in the Name Field

Note: You may use the Guided view option or the All Fields view option to complete the information for your new item. Guided View is an assisted entry process, and All Fields view is a speedier entry process for more experienced users.
4. Type in the SKU field
5. Type in the UPC Barcode field
6. Select from the Unit of Measure dropdown

Until you associate a SKU to a Location, no transactions can be taken with your new item. Be sure to associate the item with a location once you complete your entries.
Unit Conversion

While this is an optional field, this a very useful feature. This allows you to link 2 or more SKUs so that they can be broken down into small units correctly. For example: a SKU of a Vial of Botox (Botox-100U-Vial) that comes in a 10 -pack case (Botox-100U-PK10). You would create two separate items, one for the individual vial and one for the case of 10. Using "Link Conversion", you link them together. The Case of 10 will break down into single vials automatically without needing further user intervention. Best practice is to create the smallest level conversion first (in this example, the vial) and then create the larger unit of measure item (the pack of 10).
7. Select another SKU for "item converts down to"
8. Type the amount it converts to in the Quantity field
Attributes
9. Tracked Elements are for any items with which you would like to capture extra data to track within the system. Specifically, Expiration, Lot or Serial tracking. If you wish to track any/all of these attributes for any item, complete the corresponding fields at setup.
Note: when these attributes are enabled, the system will require these fields be complete/captured for all related transactions. For example, if you enable Lot and Expiration for an item, the system will require you to capture the Lot Number and an Expiration date to complete the receipt.
Categories and Locations
10. Click "Add Category"
You can create unique hierarchies for categories so that two or more categories can fall under a parent category. While categories are entirely optional, add value to your reporting needs as well as the ability to quickly find a similar items to what you are looking for.
11. Select the desired category from the list
12. Click "Add Category"
Barcodes
Barcodes will allow users to easily scan items for any transactions such as receiving or Takes. You can add more than one barcode for any item. Supported barcodes include UPC, GTIN, QR Code, 1D, and 2D.
Locations
13. Click "Add Location".
Locations are where you will associate items to your various locations. With this capability, you will be able to ensure which items are allowed to have transactions performed at a given location. Additionally, you will be able to set other unique features for each location.
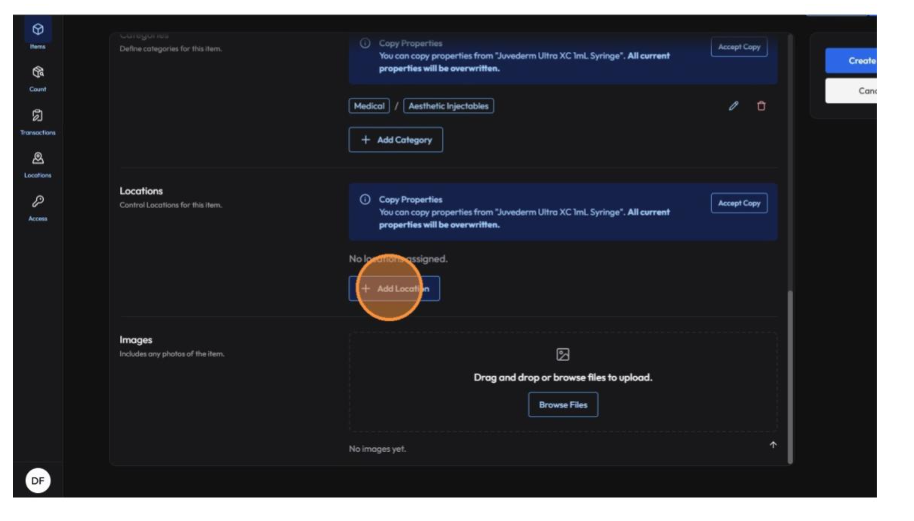
Note: If you do not set a SKU as active at a location, you will not be permitted to perform any transactions against that item at that location.
14. Select Location from the location dropdown
15. Click "Add Location"
16. Enable location specific target quantities
17. Set minimum target quantity
The minimum quantity will allow you to receive a Low Stock notification whenever an item's stock level is approaching that quantity.
18. Set Reorder target quantity. The Reorder quantity represents the quantity at which you would like to reorder more of that item for inventory at a given location.
19. Set Ideal target Quantity. The ideal quantity is the level of inventory of a given item that you would like to always maintain at a given location. When the stock is 15% above that quantity, you will see the quantity as a "Surplus".
Finish Item Creation
20. To complete your item creation in the system, click the "Create Item" button.
Related Articles
HOW TO CONFIGURE A NEW GROUP & CREATE NOTIFICATIONS
Learn how to efficiently create a new group within your platform, assign specific roles, add users, and set up necessary locations. This guide also covers adding automated notifications to ensure your team stays informed and organized. Access ...HOW TO CREATE & CONFIGURE A NEW ACCESS ROLE & PERMISSIONS
This guide walks you through the process of setting up a new user role with specific permissions. Learn how to assign necessary resources and save your configurations efficiently. Role Creation 1. Navigate to ...HOW TO CREATE & CONFIGURE A NEW USER PROFILE
Learn how to efficiently add a new user to your system by setting up their profile, location access, and specific permissions. This guide ensures you can correctly assign roles, groups, and notification settings for seamless account management. User ...HOW TO CREATE & CONFIGURE A NEW ROLE USING A TEMPLATE
Learn how to efficiently set up a new user role within the platform by defining names and selecting specific templates. This guide simplifies the role management process to help administrators maintain organized access control. Navigation 1. Navigate ...HOW TO ADD A NEW CHILD LOCATION
Learn how to efficiently organize your facility by creating a new sub-location within an existing parent category. This guide walks you through the steps to name and save new locations that should operate under the umbrella of another location (i.e.: ...